
Entry #6- It's Morphin' Time!
- jamescgonzales
- Jan 29, 2021
- 3 min read
Morphological Operations - Erosion and Dilation
We have done some image enhancements from the previous posts, such as histogram manipulation, Fourier transform, and white balancing. This time, we will focus on the morphological operation used to clean images.
Morphological operations operate on a given image with another smaller matrix as a structuring element. It transforms each image's pixel based on the values of the structuring element.
There are two morphological operations to be discussed here.
The first is erosion, which reduces the image based on the structuring element. The second is dilation, which expands the image also based on the structuring element.
To further explain, let's visualize the morphological operations above.
Let's begin by loading the necessary libraries.
import numpy as np
import matplotlib.pyplot as plt

from skimage.io import imread, imshow
from skimage.morphology import erosion, dilation
from skimage.draw import circle
For our sample image, let's draw a circle using numpy.
For the structuring element, we define a smaller matrix also using numpy.
Now let's apply the erosion using the structuring element we defined and compare the output with the original image
We can observe that the image shrunk. Let's try to erode the image more by cascading the erosion function.
So what if we wanted to erode more? We can create a function that will perform that. The function below will return an eroded image based on the image's input, the number of times we wanted the image to be eroded, and the structuring element.
def multi_ero(im, num, sel):
    for i in range(num):
        im = erosion(im, sel)
    return im
So let's loop.
Now for Dilation, we will use another image but with the same structuring element.
and we can also create a function to for multiple dilation and try using it.
In contrast to erosion, dilation, expands the image with the given the structuring element.
Let's try to use more structuring elements to the image
selem_horizonal = np.array([[0, 0, 0],
                            [1, 1, 1],
                            [0, 0, 0]])

selem_vertical = np.array([[0, 1, 0],
                           [0, 1, 0],
                           [0, 1, 0]])

selem_diag = np.array([[0,0,1],
                       [0,1,0],
                       [1,0,0]])
Erosions using horizontal structuring element
Dilations using horizontal structuring element
Erosions using vertical structuring element
Dilations using vertical structuring element
Erosions using diagonal structuring element
Dilation using diagonal structuring element
By observation we can see that the structuring element drives the shape of the original image.
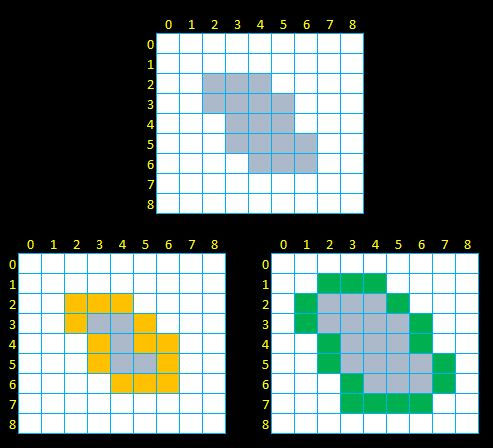
The structuring element's size is not limited to the one I used above. With the structuring element's size, the given image's shape can be altered, as shown below. Let's go under the hood on what's going on during erosion.
Consider the image below that is eroded.
As the structuring element moves from left to right then from top to the bottom of the image. It scans for a HIT to mark the pixel for removal. If the structuring image FITS the pixel of the image, it will retain the pixels.
Based on Scikit-image' erosion documentation (https://bit.ly/3oqXDWk):
Morphological erosion sets a pixel at (i,j) to the minimum over all pixels in the neighborhood centered at (i,j). Erosion shrinks bright regions and enlarges dark regions.
Let's also see how dilation works. We will consider the same image but with dilation..
Based on the Scikit-image's dilation documentation https://bit.ly/3pw1vXf. It states that: Morphological dilation sets a pixel at (i,j) to the maximum over all pixels in the neighborhood centered at (i,j). Dilation enlarges bright regions and shrinks dark regions.
Here's something interesting. Let's convert a diamond shape into a heart shape by dilating it with a structuring element.
There are more morphological functions in scikit-image library. Here are some other commonly used: Opening and Closing.
Let's import the libraries as well
from skimage.morphology import opening, closingClosing - is a morphological chain operation composed of a dilation followed by an erosion. It tends to “close” up (dark) gaps between (bright) features, which is stated on scikit-image documentation.
Here's an image which contains lines with gaps. We will be using Closing to "close those gap" without altering the neighboring lines.
Using the structuring element and closing function, the gaps on the given image were safely closed.
Opening - is another morphological chain operation that is composed of erosion followed by dilation. It tends to "open" up (dark) gaps between (bright) features, as stated in Scikit-image documentation.
Given the example, thru opening we can remove either horizontal or vertical lines depending on the structuring element that will be used.
The selection or creation of structuring elements, is heuristics and will also depend on the image size as well as the object within the image being filtered.
In summary, we have demonstrated the use of morphological operations such as erosions, dilation. Erosion shrinks the image, while dilation expands the image. We also used some common chained morphological operations such as opening and closing. The result of morphological operations greatly affected by the use of the structuring element.
I hope, in some way and this post enriches your understanding of this topic.
Thanks for visiting.
Comments