
Entry #10 Projection Makes Perception
- jamescgonzales
- Jan 31, 2021
- 3 min read
The Homography Image Projection.
There are times when photos are taken at a particular angle, the object of interest can be hard to interpret. But with a right perspective angle, more insights can be derived from an image.
Enter Homographies.
Homographies are transformations of Euclidean space that preserve the alignment of points [1] in two dimensions.
There are different types of transformations such as:
Affine or shear transformation - which preserves lines as well as parallelism of points),
Euclidean - maintains the Euclidean distance between pairs of points
Similarity - keeps the shape of objects, combines scaling, translation and rotation.
Projective transformation, which is mostly called homography, preserves the lines but not necessarily the parallelism of objects.
For this post, we will be demonstrating homography image projection.
Let's begin.
We'll start by importing the good 'ol python libraries:
import numpy as np
import matplotlib.pyplot as plt
from skimage.io import imread, imshow
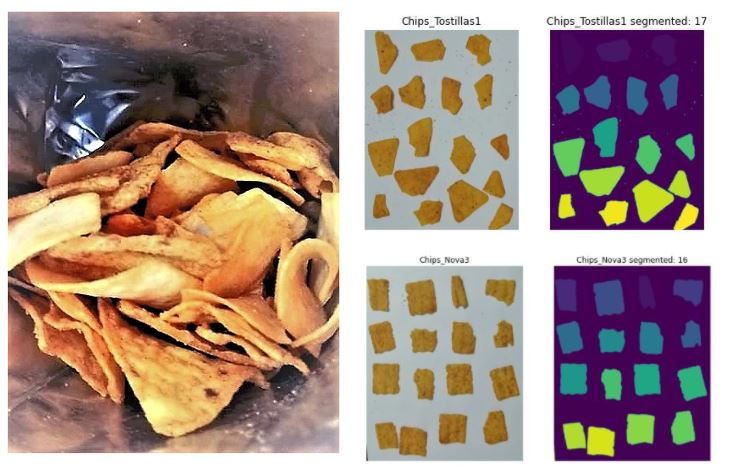
from skimage import transformThen we'll load our image.
For this image, we would like to change the viewer's perspective from angled to top view.
But we need to select a plane on the image. Let's choose 4 points to represent the plane. We will be taking notes of each point's coordinates.
We can use MS Paint to determine the pixel coordinates of points in your image quickly.
For the photo above, I have selected the following points and their coordinates:
point1 = (300, 300) point2 = (375, 470) point3 = (670, 375) point4 = (555, 240)
Next is to estimate how I will project the plane I selected. The following points represent the projection points of the plane.
pointA = (300, 266) pointB = (375, 466) pointC = (510, 466) pointD = (510, 266)
We will be converting these points into a NumPy array to be used later. Let's assign the src variable to hold the source coordinate matrix and the dst variable for the destination coordinate matrix.
src = np.array([(300, 300),
                (375, 470),
                (670, 375),
                (555, 240)]).reshape(4,2)

dst = np.array([(300, 266),
                (300, 466),
                (510, 466),
                (510, 266)]).reshape(4,2)
Now, let's use the scikit-image transform.estimate_transform to store and estimate 2D geometric transformation parameters and assign them to the variable tform. We will use 'projective` for the homography parameter.
tform = transform.estimate_transform('projective', src, dst)And then, we can warp the image using transform.warp
tf_img = transform.warp(ingredients, tform.inverse)Let's display the image, side by side with the original.
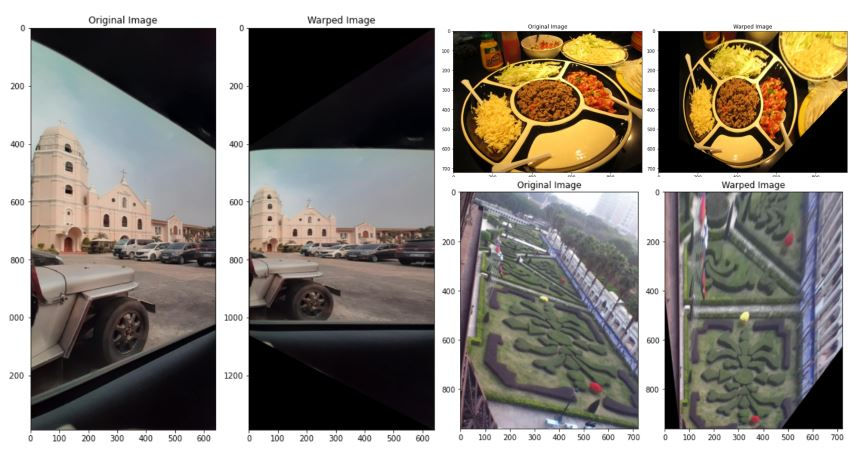
Nice. We have projected the plate from a different angle to top view.
Let's create a function that will show the original and projected image. The function will display the reference points used for reference.
def img_projection(image, src, dst):
    """
    Create a projection of image given a source and destination
    matrices
    """
    x_src = [val[0] for val in src] + [src[0][0]]
    y_src = [val[1] for val in src] + [src[0][1]]

    x_dst = [val[0] for val in dst] + [dst[0][0]]
    y_dst = [val[1] for val in dst] + [dst[0][1]]

    fig, ax = plt.subplots(1,2, figsize=(8,10))

    image_copy = image.copy()
    projection = np.zeros_like(image_copy)

    tform = transform.estimate_transform('projective',
                                         np.array(src),
                                         np.array(dst))
    warped_image = transform.warp(image, tform.inverse)

    ax[0].imshow(image_copy);
    ax[0].plot(x_src, y_src, 'bo--')
    ax[0].set_title('Original Image')

    ax[1].imshow(warped_image)
    ax[1].plot(x_dst, y_dst, 'bo--')
    ax[1].set_title('Warped Image')
    plt.tight_layout()

    return warped_image
Loading the image we used previously:
img_projection(ingredients, src=src, dst=dst)would output...
Like the previous output, this shows the top view version of the image. The edge of the original image were seen on the warped image as well. Please take note that we warped image is based on the object of interest, which is the center of the serving plate.
Let's try other images for fun.
Here's a photo of a church building, taken inside a car in an angled position. Let's twist the image to make it appear that the shot is taken in front of the building.
Here are the selected coordinates:
src_church = np.array([(6, 40),
                       (6, 1280),
                       (637, 1012),
                       (637, 424)]).reshape(4,2)

dst_church = np.array([(6, 424),
                       (6, 1012),
                       (637, 1012),
                       (637, 424)]).reshape(4,2)
Let's check the transformed image.
img_projection(church, src_church, dst_church)Since the object of interest is the image bounded by the car's window, it is easy to set the coordinates.
Let's try one more image. :)
Here's a photo of a garden in Shenzhen.
Here are the selected coordinates:
src_garden = np.array([(100, 355),
                       (90, 557),
                       (673, 703),
                       (529, 498)]).reshape(4,2)

dst_garden = np.array([(94, 513),
                       (94, 805),
                       (540, 805),
                       (540, 513)]).reshape(4,2)
Let's check the original and transformed image.
img_projection(garden, src_garden, dst_garden)We have twisted the original image from the image to make it appear that the shot was taken on top. We should also note that distortion (i.e., the flags and trees) of the image is expected during the warping process.
To summarize, some images, to extract more information, need to be transformed or projected. Thru homography, an image can be transformed in Euclidean space. We can twist, turn, scale, or even flip the image given the plane's reference point of source and destination. When the image is transformed, some portion of the image, especially elements on edge, can be distorted. To execute homography, we can use scikit-images' transform library.
Here's the link of the library's documentation.-: https://scikit-image.org/docs/stable/auto_examples/transform/plot_transform_types.html.
Alright! That's about it. Thanks again for taking time to read on this post. Have a good day.

Comments